Showing posts with label weblogic. Show all posts

Sunday, February 10, 2019

Decrypt weblogic administrator password

1- Copy the following script to a file with name "decryptPassword.py" :
import os
import weblogic.security.internal.SerializedSystemIni
import weblogic.security.internal.encryption.ClearOrEncryptedService
def decrypt(domainHomeName, encryptedPwd):
    domainHomeAbsolutePath = os.path.abspath(domainHomeName)
    encryptionService = weblogic.security.internal.SerializedSystemIni.getEncryptionService(domainHomeAbsolutePath)
    ces = weblogic.security.internal.encryption.ClearOrEncryptedService(encryptionService)
    clear = ces.decrypt(encryptedPwd)
    print "RESULT:" + clear
try:
    if len(sys.argv) == 3:
        decrypt(sys.argv[1], sys.argv[2])
    else:
  print "INVALID ARGUMENTS"
  print " Usage: java weblogic.WLST decryptPassword.py  "
  print " Example:"
  print " java weblogic.WLST decryptPassword.py D:/Oracle/Middleware/user_projects/domains/base_domain {AES}819R5h3JUS9fAcPmF58p9Wb3syTJxFl0t8NInD/ykkE="
except
    print "Unexpected error: ", sys.exc_info()[0]
    dumpStack()
    raise

2-  Open the CMD 
go to weblogic home bin folder andwrite: setDomainEnv.cmd:
cd C:\Oracle\Middleware\Oracle_Home\user_projects\domains\base_domain\bin
setDomainEnv.cmd
 then navigate to the location of the file then write the following line:
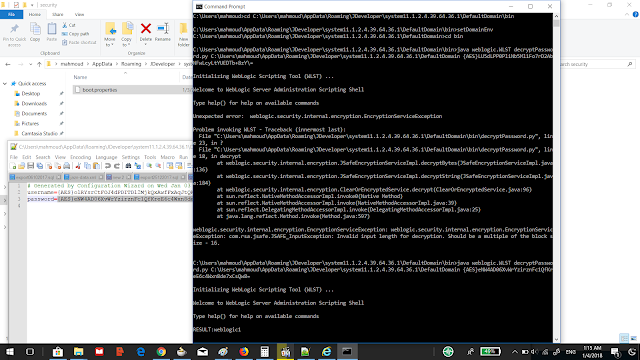
java  weblogic.WLST decryptPassword.py <DOMAIN_HOME> <ENCRYPTED_PASSWORD>
java weblogic.WLST decryptPassword.py C:\Users\mahmoud\AppData\Roaming\JDeveloper\system11.1.2.4.39.64.36.1\DefaultDomain {AES}eNW4AD06XvWrYzirznFc1QfKreE6c4Wxn8de7xCsQw8=


Tuesday, February 23, 2016

Upload users to weblogic using ant tool

To upload users for Human Task flows in bpm  ( Windows Platform ):
1- Download ant from:
https://ant.apache.org/bindownload.cgi

2- At Environment Variables:
add System Variable: "ANT_HOME" = D:\bpm\apache-ant-1.9.6-bin\apache-ant-1.9.6
at path variable add the value : %ANT_HOME%\bin

3- open cmd and write 'ant' ,if the command gives error in java can't found:
move the JAVA_HOME variable from user variable to system variable.

4- Download an application from:
http://blogs.oracle.com/ajaysharma/resource/workflow-001-DemoCommunitySeedApp.zip
Unzip the file
and modify the:
a-
 "build.properties" file to your  weblogic location and the SOA domain location and.the target server and admin user name and password as follows:
bea.home=C:\\Oracle\\Middleware\\Oracle_Home3
oracle.home=${bea.home}\\Oracle_Home3
domain.home=${bea.home}\\user_projects\\domains\\base_domain
target=soa_server1
admin.name=weblogic
admin.pwd=weblogic1
b-
 "build.xml" file , change the property "wls.home" to follow your wlserver name as follows:
 <property name="wls.home" value="${bea.home}/wlserver"/>
5- Now deploy the application using the ant tool with the command line:
ant seedDemoUsers

6- Open that application by the following link with port of your SOA domain
http://localhost:7004/integration/SOADemoCommunity/DemoCommunitySeedServlet
and click the submit button:
The result is that users are uploaded to the weblogic SOA domain.


Problem: if you got the error while submit the previous url button:
( Exception: ORABPEL-10555 Identity Service Configuration error. Identity Service Configuration has error. Please refer to the identity service configuration guidelines and correct the Identity Service configurations. Contact Oracle Support Services if error is not fixable) ,

Solution: You have to use your managed server port at the URL that is different than the admin server(7001),

Following picture show my port of the SOA server( 7003 ):


Wednesday, January 27, 2016

SOA installation ( 12c )

Steps to install SOA
1- Download then install jdk 8.
http://www.oracle.com/technetwork/java/javase/downloads/jdk8-downloads-2133151.html

2- Download then install Jdeveloper 12.2.1
http://www.oracle.com/technetwork/developer-tools/jdev/downloads/index.html

3- Download then install SOA 12c then choose the home path as Oracle_Home of the installed Jdeveloper.
http://www.oracle.com/technetwork/middleware/soasuite/downloads/index.html
Note that you should use jdk 8 to install it:
"C:\Program Files\Java\jdk1.8.0_65\bin\java.exe" -jar D:\fmw_12.2.1.0.0_soa_quickstart.jar

4- Download and install Oracle Database 12c and keep in mind the name of the pluggable database and the administrative password  created during installation ( default name is pdborcl).

5- Edit the file tnsnames.ora to add the created pluggable database as a service located at path
D:\app\YOUR_COMPUTER_USER_NAME\product\12.1.0\dbhome_1\NETWORK\ADMIN

PDBORCL=
  (DESCRIPTION=
    (ADDRESS=
      (PROTOCOL = TCP)
      (HOST = localhost)
      (PORT = 1522)
    )
    (CONNECT_DATA=
      (SERVER = DEDICATED)
      (SERVICE_NAME= pdborcl.YOUR_DOMAIN_NAME)
    )
  )

5- Open the RCU.exe as administrator from path
C:\Oracle\Middleware\Oracle_Home\oracle_common\bin
- UserName is sys.
- Password is the administrative password created during installing of Oracle Database
- Service name will be the name of your pluggable database + YOUR_DOAMIN_NAME
e.g. pdborcl.blogger.com.
- Role is SYSDBA

6- Open the config.cmd then create domain from path:
C:\Oracle\Middleware\Oracle_Home\oracle_common\common\bin click config.cmd

Notes:
1- To connect to your pluggable database, you can use the url:
jdbc:oracle:thin:@localhost:1522/pdborcl.YOUR_DOMAIN_NAME

2- If you got error as:
Status : Failure -Test failed: ORA-01033: ORACLE initialization or shutdown in progress
O[en the PLSQL command line and log as admin and execute the following two lines:
alter session set container = pdborcl;
alter system enable restricted session;

If not worked tr use the following:
alter database open
alter pluggable database pdb_name save state;


shutdown immediate
startup

3-To start the admin server
Open the cmd command line then go to path:
C:\Oracle\Middleware\Oracle_Home\user_projects\domains\base_domain\bin
and write StartWeblogic.cmd

To start the managed server go to the same path 
and write StartManagedWeblogic.cmd soa_server1


4- To unlocck user:
alter user DEV_STB account unlock;


Sunday, November 9, 2014

Deploy image as resource for other applications

Sometimes you have classes,images or any other files that is used in most of your applications(apps.),
copied and pasted in each new application.
Solution for this is to deploy these files to be used between apps as a shared resource.
This is an example of how to deploy folder of images and use it in other apps.:

1- Locate the META-INF folder YOUR_PROJECT_NAME/.adf/META-INF
and put the images folder there. 

2- Create new ADF Library Jar File.


3- Enter name for the  Deployment Profile.


4- Now we need to get a jar file then deploy it to the server, so choose deploy for your Deployment profile.

5- A new jar has been created and ready to be deployed,
Take the path for that jar.


6- Run the integrated server of jdeveloper, At deployments make new and write the path of the jar to deploy it.


Now you can use this jar files in other applications, but you need first to add a reference for your shared jar at web.xml file.


7- As a test I created a page and added image inside, in the source property write the path:
adf/image/YOUR_IMAGE_NAME

Run the application, the image will appear as following:


java - fill distinct objects in ArrayList

If you have a list that contains some objects that it is considered as duplication when two or three fields of these objects are equal. How ...